Although you can create your own task settings from scratch, usually the most practical way of defining a new task is creating the task and copying the settings of an existing one similar to the task you want to create and then editing the settings.
Tip! You can save the definitions of a task to a file and use them as a basis for another task. To save the definitions, click ![]() in the toolbar of the Task Parameters in XML Format pane. To import definitions from a file, click
in the toolbar of the Task Parameters in XML Format pane. To import definitions from a file, click ![]() . You can attach the same definition file to different tasks, but note that if you make changes to the definitions in one task the changes will not be automatically updated to the other tasks.
. You can attach the same definition file to different tasks, but note that if you make changes to the definitions in one task the changes will not be automatically updated to the other tasks.
The system includes a set of example task settings for some task IDs that may be used (see the table in User interface task IDs).
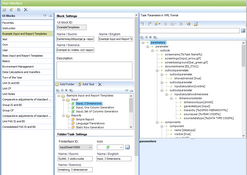
When selecting a UI block, the folders and tasks of that block are shown in the Block Settings pane. From the tree structure, select the task whose parameters you want to edit. The task parameters are shown in XML format tree structure in the Task Parameters in XML Format pane.
Figure 13: Task parameters in the XML tree
In the following sections editing of XML definitions in Clausion FPM is described. If you choose to modify the XML definitions in an editor outside Clausion FPM, remember to import the XML parameters file to the task after modification.
Constructing the XML parameters is facilitated by a list of built-in actions (Delete, Copy, Insert) as well as of eligible sub-elements, attributes and values available in the XML editor. Select an element in the tree, click the element with the right mouse button and select the desired action from the pop-up menu.
Note! Save the UI definitions after editing the task parameters. There is no button for saving only the task parameters but the UI definitions as a whole, including all blocks and tasks, are saved at the same time.
1.Select the position where you want to add an element. a.Click the element with the right mouse button and select b.Click 2.The pop-up menu contains the elements that can be added to the next level of the currently selected element. When you add an element, the mandatory elements under it are added automatically. You can also copy elements: Select the position where you want to copy an element. a.Click the element with the right mouse button and select b.Click The copy of the element is added to the hierarchy on the same level under the original element. Tip! The system includes a set of example task settings that may be added under the parameter element (see Example task settings). Click the parameter element with the right mouse button and select If the XML schema allows, you can move elements to different locations. When an element that can be moved is selected, the |
The values of the elements and attributes are shown in brackets after the element/attribute name in the tree. When you select an element/attribute in the tree, the value is shown in the lower pane under the tree where you can edit it. If there are errors in the element settings, the element and all its parent elements are marked with the error icon Type the desired value in a text field. If you try to enter an invalid value for an attribute, the warning icon If an attribute has fixed options, select an option from the drop-down list. Moving an element If the XML schema allows, you can move elements to different locations. When an element that can be moved is selected, the Deleting an element Select the element that you want to delete from the tree. a.Click the element with the right mouse button and select b.Click |
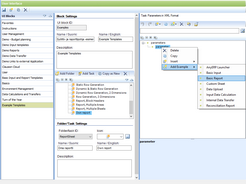
The system includes predefined example settings for the following tasks: •anyERP launcher tasks •basic input tasks •basic reporting tasks •custom sheet tasks •data upload tasks •input data calculation tasks •internal data transfer tasks •reconciliation report tasks •XBRL report task When you add one of these tasks, the parameters and parameter elements are added by default. Example task settings are added by clicking the element with the right mouse button and selecting Figure 14: Adding a UI example Note! For basic input and report task and custom sheet task examples the document name must be set before the task can be used. Note! The example settings cannot be added if corresponding settings already exist. In this case you need to remove the outlook element before you can use the default example settings. Note! In most of the example settings, the 'value' setting of year, period, data type and dimension is empty by default (in the input task, report task and reconciliation task example settings the %GLOBAL YEAR% and %GLOBAL PERIOD% parameters are used as default values for period and year). If you leave the value setting empty, the first value of the drop-down list is selected by default for the year, period and data type components. For the dimension component, the dimension is not selected by default in the user interface, and when a user selects it, the default unit is selected for the dimension. |

